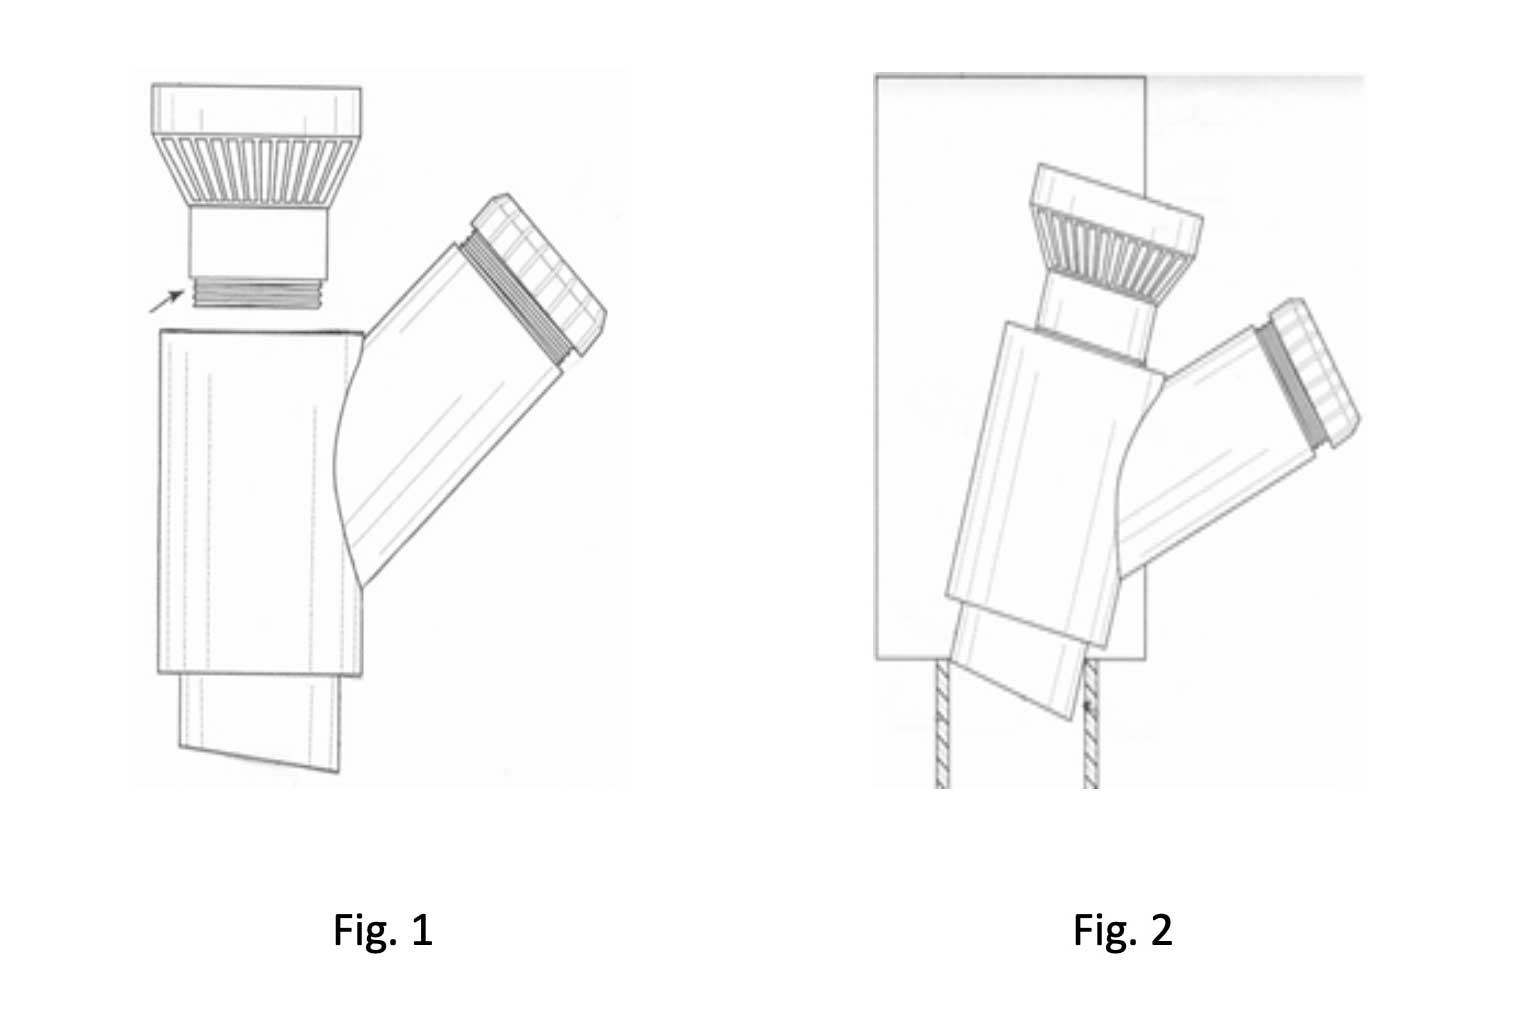
1. Dry-Fit the STANDPIPE SEAL Wye into the 2” PVC standpipe (INSIDE DIMENSION OF PVC PIPE VARIES!) – It may be necessary to remove some material from the inside of the standpipe for a proper fit). Make any necessary adjustments to the inside of the standpipe prior to applying primer & glue to the Wye.
2. Apply Plumber’s tape to the threads of the Air Admittance Valve (AAV) and screw into the Wye (Fig. 1). * If space is limited within the Outlet Box, install the AAV after completing Step #3.

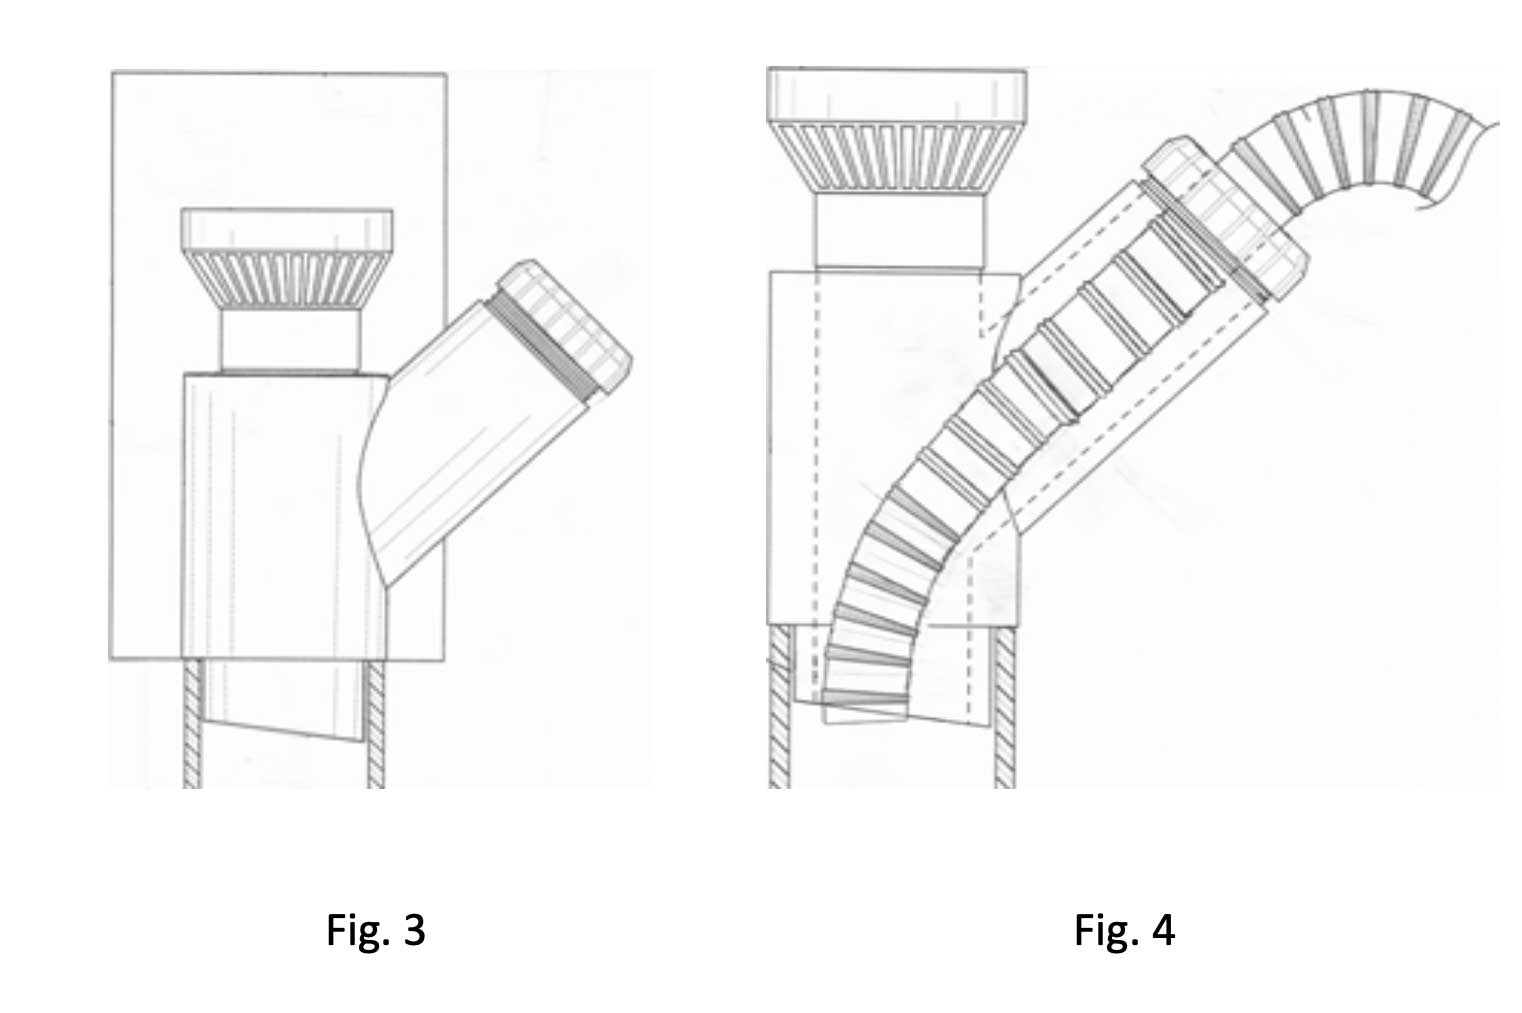
3. After confirming a proper fit, make sure both the Wye and the inside of the standpipe are free of any dust or debris. First, Apply primer to the outside lower section of the Wye and the inside upper portion of the standpipe. Second (After primer has dried), Apply glue to the areas previously primed and insert into the standpipe (Fig. 2). Make sure the Wye is fully seated in the desired position and allow the appropriate amount of time for drying according to the glue manufacture’s instructions (Fig. 3).
4. Measure and mark the washing machine’s discharge hose approximately 7” from the end (This is to make sure the discharge hose is fully facing downward within the standpipe). * If the end of the discharge hose has a straight non-flexible section, it will need to be removed to allow flexibility.

5. Slide the collar onto the discharge hose with the threads pointed towards the end of the hose (Collar will be loose). Next, slide the appropriate size gasket onto the discharge hose at the established 7” mark. The gasket is designed to be flexible and can stretch to create an airtight fit around the hose.
6. Slide the discharge hose fully into the Wye (discharge hose should be facing downward in the standpipe, not angled). Confirm the gasket is flat and fully seated on the Wye and hand tighten the collar to create an airtight seal. (Fig. 4) *Additional option, the discharge hose can be inserted into the gasket after the gasket has been secured onto the Wye with the collar.
7.Inspect the STANDPIPE SEAL and discharge hose for proper installation. Make sure there are no gaps between the gasket and the discharge hose and that an airtight seal has been created.
Installation Is Now Complete
- STANDPIPE SEAL should be installed in areas with a temperature range between –40° F and +150° F
- STANDPIPE SEAL shall be installed in an accessible location that allows for adequate air to enter into the device
- STANDPIPE SEAL must be installed in the upright and vertical position, not exceeding 15° from plumb vertical alignment
- A minimum of one stack vent shall extend outdoors to the open air to serve as positive pressure relief for the drainage system
- This device is not designed to relieve positive pressure
- Installation shall be in accordance with the manufacture’s instructions and in compliance with all local Plumbing Code Requirements
- Refer to local plumbing codes for proper method of venting where pumps or pressurized flushing devices are used, or where multiple floors are encountered
- This device has a Drainage Fixture Units (DFU) rating of the following: Horizontal Branch = 20 DFU, Stack Vent = 8 DFU
- Minimum required height within an Outlet Box is 5 5/8” (5.625)
A Division of JK PLASTICS Raleigh, NC 27617 — Part # 11829 – US Patent No. 9,534,363
1. Coloque en seco la ESTRELLA DE SELLO DE TUBERÍA VERTICAL en la tubería vertical de PVC de 2″ (¡LA DIMENSIÓN INTERIOR DE LA TUBERÍA DE PVC VARÍA!) – Puede ser necesario quitar algo de material del interior de la tubería vertical para un ajuste adecuado). Hacer cualquier ajustes necesarios en el interior de la tubería vertical antes de aplicar imprimación y pegamento a la estrella.
2. Aplique cinta de plomero a las roscas de la válvula de admisión de aire (AAV) y atorníllela en la estrella (Fig. 1). * Si el espacio es limitado dentro de la caja de salida, instale el AAV después de completar el Paso # 3.

3. Después de confirmar un ajuste adecuado, asegúrese de que tanto la estrella como el interior del tubo vertical estén libres de polvo o escombros. Primero, aplique imprimación a la sección inferior exterior de la estrella y a la parte superior interior de la tubo vertical. En segundo lugar (después de que la imprimación se haya secado), aplique pegamento a las áreas previamente imprimadas e insértelo en el tubo vertical (Fig. 2). Asegúrese de que el Wye esté completamente asentado en la posición deseada y deje el tiempo adecuado para que se seque de acuerdo con las instrucciones del fabricante del pegamento (Fig. 3).
4. Mida y marque la manguera de descarga de la lavadora aproximadamente a 7″ del extremo (esto es para asegurarse de que la manguera de descarga esté completamente orientada hacia abajo dentro del tubo vertical). * Si el extremo de la manguera de descarga tiene un sección recta no flexible, deberá retirarse para permitir la flexibilidad.

5. Deslice el collar sobre la manguera de descarga con las roscas apuntando hacia el extremo de la manguera (el collar estará suelto). A continuación, deslice la junta del tamaño apropiado en la manguera de descarga en la marca establecida de 7″. La junta está diseñado para ser flexible y puede estirarse para crear un ajuste hermético alrededor de la manguera.
6. Deslice la manguera de descarga completamente en la estrella (la manguera de descarga debe estar hacia abajo en el tubo vertical, no en ángulo). Confirme que la junta esté plana y completamente asentada en la estrella y apriete a mano el collar para crear un Sello hermético (Fig.4). * Opción adicional, la manguera de descarga se puede insertar en la junta después de que la junta se haya asegurado en la estrella con el collar.
7. Inspeccione el SELLO DEL TUBO VERTICAL y la manguera de descarga para verificar que estén correctamente instalados. Asegúrese de que no haya espacios entre la junta y la manguera de descarga y que se haya creado un sello hermético.
LA INSTALACIÓN YA SE HA COMPLETADO
- El SELLO DE TUBO VERTICAL debe instalarse en áreas con un rango de temperatura entre -40 ° F y + 150 ° F
- El SELLO DE TUBO VERTICAL debe instalarse en un lugar accesible que permita que entre aire suficiente en el dispositivo
- El SELLO DE TUBO VERTICAL debe instalarse en posición vertical y vertical, sin exceder los 15° de la alineación vertical de la plomada
- Un mínimo de un respiradero de chimenea debe extenderse al aire libre para servir como alivio de presión positiva para el sistema de drenaje
- Este dispositivo no está diseñado para aliviar la presión positiva
- La instalación debe estar de acuerdo con las instrucciones del fabricante y de acuerdo con todos los requisitos del código de plomería local
- Consulte los códigos de plomería locales para conocer el método adecuado de ventilación donde se utilizan bombas o dispositivos de descarga presurizados, o
- donde se encuentran varios pisos
- Este dispositivo tiene una clasificación de unidades de accesorios de drenaje (DFU) de lo siguiente: rama horizontal = 20 DFU, ventilación de chimenea = 8 DFU
- La altura mínima requerida dentro de una caja eléctrica es 5 5/8” (5.625)
A Division of JK PLASTICS Raleigh, NC 27617 — Part # 11829 – US Patent No. 9,534,363
